Deploying Swagger-UI to S3 using Terraform

I use Terraform by Hashi Corp. almost exclusively — not just for standing up entire environments, but also for continuous deployment of EC2 instances, Lambda functions, and even static S3 websites.
Recently, I was asked to host the Swagger UI on a private s3 bucket. I immediately started writing a reusable Terraform module for this job. The purpose of this job is to not just create a S3 bucket, but also to download the specified version of the Swagger UI, copy the necessary files to our newly created bucket, and to create a Route53 record, so we can have an easy-to-remember address.
Be aware that you should only need to modify default values in the variables section at the top of the template.
You can download the template used in this post from GitHub.
Prerequisites
Terraform — Download it directly from the Terraform’s download page. If you have brew installed on your Mac, you can simply open a terminal and type brew install terraform.
AWS CLI — Follow these instructions to install, or use brew install awscli using Homebrew.
Environment Variables — Variables AWS_ACCESS_KEY_ID and AWS_SECRET_ACCESS_KEY must be set to your AWS access and secret keys.
Variables
Using the text editor of your choice, start a new file for this project. At the top we will put the variables used.
variable "region" {default = "us-west-2"}
variable "website_dns" {default = "swagger-ui.webblab.info"}
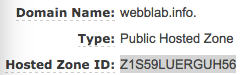
variable "r53_zone_id" {default = "Z1S59LUERGUH56"}
variable "swagger_ui_version" {default = "v2.2.5"}
These are straight-forward and self-explanatory:
- region used to specify region S3 bucket will be created
- website_dns is used not only to create the Route53 record, but also to name the S3 bucket since Amazon requires the bucket name match the DNS record.
- r53_zone_id specifies the Hosted Zone ID of the Route53 domain used for our bucket name
- swagger_ui_version is the version of the Swagger-UI to install to the bucket. See the Swagger-UI Releases page for a list of valid versions. When new versions are released, simply edit this value and apply the template to install the specified version.
Provider
You must always have an AWS provider section. Below is a basic version that simply uses the region variable in the Variables section.
provider "aws" {
    region = "${var.region}"
}
S3 Bucket
A bucket to hold the Swagger UI files is the most important item we need. Since this will be a publicly accessible, the acl property will be set to public-read.
The website sub-section turns on static web-hosting for the bucket and specifies the index and error documents.
resource "aws_s3_bucket" "main" {
    region = "${var.region}"
    bucket = "${var.website_dns}"
    acl = "public-read"

    website {
        index_document = "index.html"
        error_document = "index.html"
    }
}
Route53 Record
Using a Route53 A record the S3 static site will have a more memorable DNS name. Notice how for the alias settings that values projected from the created bucket are used.
resource "aws_route53_record" "main" {
    name = "${var.website_dns}"
    type = "A"
    zone_id = "${var.r53_zone_id}"

    alias {
        name = "${aws_s3_bucket.main.website_domain}"
        zone_id = "${aws_s3_bucket.main.hosted_zone_id}"
        evaluate_target_health = false
    }
}
Template File
Terraform doesn’t include a built in method of downloading files and placing them on S3. To force Terraform to do things it might not do by default, a null_resource can be used to run custom scripts locally or on a remote system. The script is typically built using a template_file.
data "template_file" "main" {
    template = <<EOF
    curl -L https://github.com/swagger-api/swagger-ui/archive/${var.swagger_ui_version}.tar.gz -o /tmp/swagger-ui.tar.gz
    mkdir -p /tmp/swagger-ui
    tar --strip-components 1 -C /tmp/swagger-ui -xf /tmp/swagger-ui.tar.gz
    aws s3 sync --acl public-read /tmp/swagger-ui/dist s3://${aws_s3_bucket.main.bucket} --delete
    rm -rf /tmp/swagger-ui
EOF
}
This is simply a bash script that will be ran by the local_provisioner portion of the null_resource. Notice the two locations where the variable swagger_ui_version and the S3 bucket name will be replaced in the script by Terraform.
Null Resource
There are two parts to this null_resource.
- Triggers — The purpose of triggers is to trigger when the local-exec provisioner runs. If none are specified, the provisioner is only ran the first time the template is processed. No matter if you change the swagger_ui_version to a newer version or not, without the variable being listed as a trigger for the null_resource to run the newer version would never be loaded.
- Provisioner — The provisioner is what does the actual work of the null_resource. There are many types of provisioners, but local-exec and remote-exec are the most commonly used ones. The provisioner below says to run the output of the template_file created above on the local machine.
resource "null_resource" "main" {
    triggers {
        rendered_template = "${data.template_file.main.rendered}"
        version = "${var.swagger_ui_version}"
    }

    provisioner "local-exec" {
        command = "${data.template_file.main.rendered}"
    }
}
Terraform Plan
First run terraform plan to see what resources Terraform is planning on creating.
$ terraform plan
+ aws_route53_record.main
alias.#: "1"
alias.~4251468460.evaluate_target_health: "false"
alias.~4251468460.name: "${aws_s3_bucket.main.website_domain}"
alias.~4251468460.zone_id: "${aws_s3_bucket.main.hosted_zone_id}"
fqdn: "<computed>"
name: "swagger-ui.webblab.info"
type: "A"
zone_id: "Z1S59LUERGUH56"
+ aws_s3_bucket.main
acceleration_status: "<computed>"
acl: "public-read"
arn: "<computed>"
bucket: "swagger-ui.webblab.info"
force_destroy: "false"
hosted_zone_id: "<computed>"
region: "us-west-2"
website.#: "1"
website.0.error_document: "index.html"
website.0.index_document: "index.html"
website_domain: "<computed>"
website_endpoint: "<computed>"
<= data.template_file.main
rendered: "<computed>"
template: "curl -L https://github.com/swagger-api/swagger-ui/archive/v2.2.5.tar.gz -o /tmp/swagger-ui.tar.gz\nmkdir -p /tmp/swagger-ui\ntar --strip-components 1 -C /tmp/swagger-ui -xf /tmp/swagger-ui.tar.gz\n\naws s3 sync --region us-west-2 --acl public-read /tmp/swagger-ui/dist s3://swagger-ui.webblab.info --delete\nrm -rf /tmp/swagger-ui\n"
+ null_resource.main
triggers.%: "<computed>"
Terraform Apply
Apply these changes to create and populate this bucket automatically. The entire process takes less than 60 seconds typically with the biggest delay being Route53 record creation.
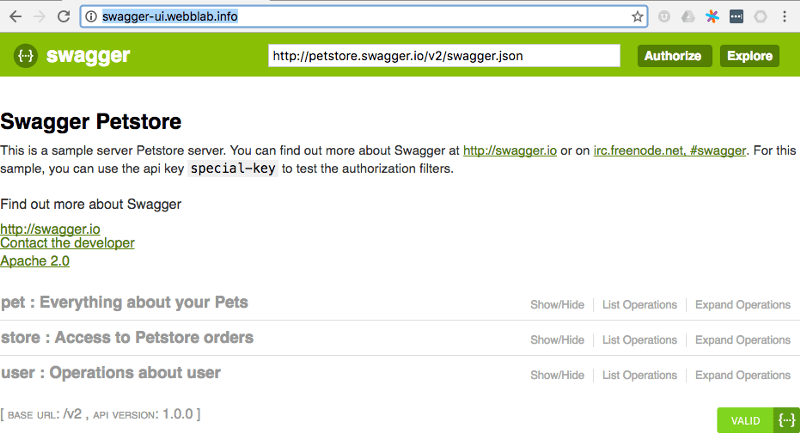
Testing the Site
Open up your browser and browse to the DNS address specified in the website_dns variable. You will be presented with a fully functional Swagger UI interface. This example can be found at swagger-ui.webblab.info.